


SFP Module Installation and Removal Guide

SFP modules are an indispensable part of the optical fiber link. Although the installation and removal of SFP modules are very simple, when using modules, you must follow the user manual for correct operation. The improper operation will reduce the service life of the module. , the more serious will cause the damage of the module. So what should be paid attention to installing and removing SFP modules? This post will show you.
What You Must Know Before Installing and Removing Modules?
- First of all, the SFP module has a service life. Every time we install and remove the module will cause wear and tear of the module, which will reduce the working life of the module. So if it is not necessary to change the position of the module, don’t remove and insert the module.
- Second, before installation and removal, make sure that all the cable is disconnected. If the cable connected to the optical module is in the connected state. In that case, it will bring potential damage to the optical module and ultimately affect its performance.
- Third, when removing the optical module or installing the optical module, please put the dust cover in the optical module interface for protection. Before connecting the optical module, clean the surface of the optical fiber to prevent dust and other contaminants from entering the optical module port, when there is foreign matter in the optical transceiver port, it will not work correctly.
- Finally, please use an ESD wrist strap or comparable grounding device to perform a grounding operation when operating. If static electricity is generated, it will damage the internal circuit of the module.
Tools to be Prepared for Transceiver Installation and Removal
- ESD wrist strap or comparable grounding device
- Antistatic mat or antistatic foam
- Optical fiber end-face cleaning tool
- troubleshooting equipment
Transceiver Module Installation Guide
SFP, SFP +, SFP28, QSFP, and QSFP28, are hot-pluggable modules. Their installation can follow the following instructions.
- Keep the ESD wrist strap on your wrist all the time, or keep the grounding equipment connected all the time. In addition, if there is a metal surface on your chassis, it is also OK.
- When the optical module is not inserted, do not remove the dust cover in the port.
- TX/RX ports should be clearly marked on different cables, it will help you to identify different ports, which is convenient for the subsequent management and other workers to repair or upgrade.
Click here to know how to make a cable labeling.
- Slide the transceiver module to the port carefully.
- After cleaning the end-face of the optical fiber, you can remove the dust cover and insert the network interface cable.
- Confirm the transceiver module inserted into the port securely.
- After all the operations, the port status LED should be green, which means you have established an optical fiber link. If the port status LED is still off, ensure that the connected device is powered on before troubleshooting.
How to troubleshoot optical transceiver?
- After you check whether it is the cable problem or the target device adapter problem, the color of the port status LED will change to amber for about 30 seconds before the indicator turns green.
- Reset the target device if necessary
Tips: Different modules have different designs and latching mechanisms. The four common types are SFP with a Mylar tab latch, SFP with a bale-clasp latch, SFP with an actuator button latch, and SFP with a slide tab latch. Devices can also have different module socket configurations. Before connecting the device, please make sure that your transceiver module and device are paired, and with the correct latch orientation.
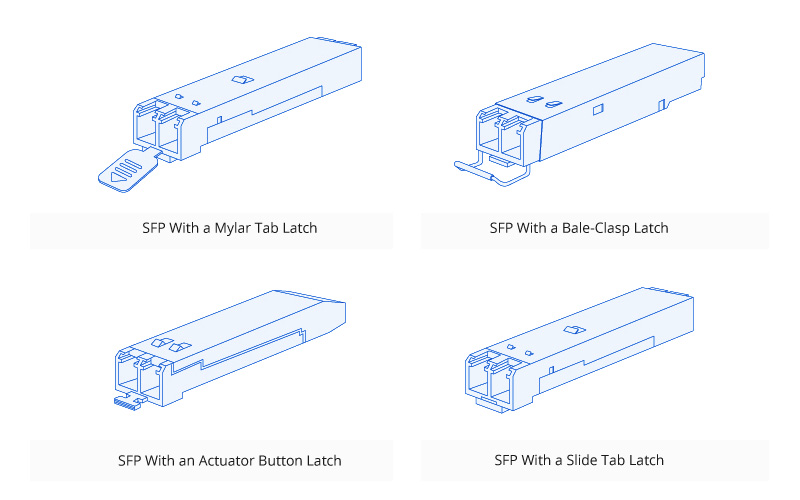
Figure 1: Different Designs and Latching Mechanisms
Transceiver Module Removal Guide
Since different structures have different latching mechanisms, the following will describe how to remove them from four different types.
Removing Mylar Tab SFP Module
- Use the ESD preventive twist strap or ankle strap mentioned earlier.
- Disconnect and remove all interface cables from the transceiver module ports, and you need to notice the current connections of the cables to the ports on the line card.
- Gently pull the tab down until it separates from the port, and then you can pull out the SFP module.
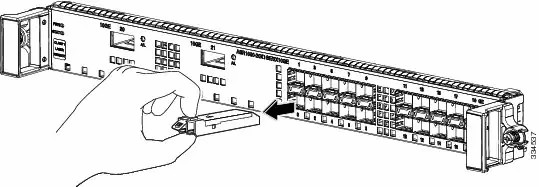
Figure 2: Removing a Mylar Tab SFP Module
- Put the SFP module on the antistatic mat, if you need to send it back to the manufacturer for repair or to other places, don't forget to put it in the anti-static bag.
- Like the SFP module, when the port on the switch is idle, it also needs to put specific cage covers in the SFP module cage to avoid dust.
Removing a Bale Clasp SFP Module
- Use the ESD preventive twist strap or ankle strap mentioned earlier.
- Disconnect and remove all interface cables from the transceiver module ports, and you need to notice the current connections of the cables to the ports on the line card.
- Use your fingers to open the bale clasp upward on the module. If you cannot open it by hand due to aging, you can use a small tool such as a flat-blade screwdriver to open the bale clasp.
- Carefully pull the SFP module out of the port
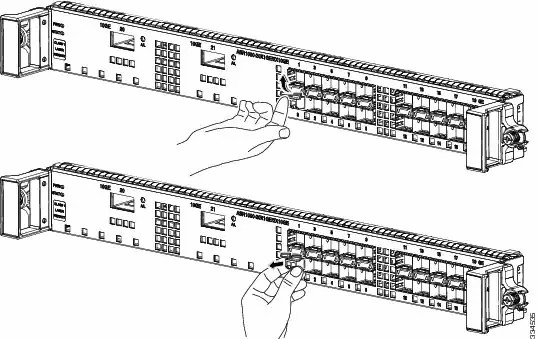
Figure 3: Removing a Bale Clasp SFP Module
- Put the SFP module on the antistatic mat, if you need to send it back to the manufacturer for repair or to other places, don't forget to put it in the anti-static bag.
- Like the SFP module, when the port on the switch is idle, it also needs to put specific cage covers in the SFP module cage to avoid dust.
Removing an Actuator Button SFP Module
- When pulling out the actuator button SFP module, you must press the button on the module firstly.
- Use the ESD preventive twist strap or ankle strap mentioned earlier.
- Disconnect and remove all interface cables from the transceiver module ports, and you need to notice the current connections of the cables to the ports on the line card.
- Gently press the button on the module until it clicks to activate the latching mechanism on the module.
- Gently pull out the module from the port by grasping the actuator button with your hand.
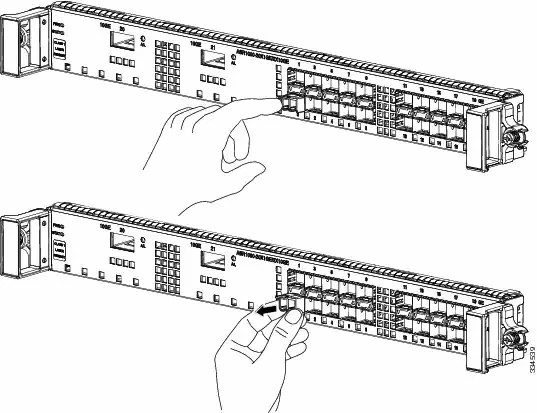
Figure 4: Removing an Actuator Button SFP Module
- Put the SFP module on the antistatic mat, if you need to send it back to the manufacturer for repair or to other places, don't forget to put it in the anti-static bag.
- Like the SFP module, when the port on the switch is idle, it also needs to put specific cage covers in the SFP module cage to avoid dust.
Removing a Slide Tap Latch SFP Module
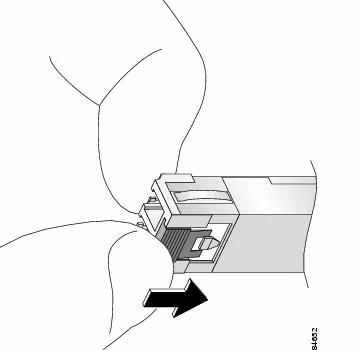
Figure 5: Slide Tap Latch SFP Module
- Use the ESD preventive twist strap or ankle strap mentioned earlier.
- Disconnect and remove all interface cables from the transceiver module ports, and you need to notice the current connections of the cables to the ports on the line card.
- Push the sliding tab of the SFP module toward the line card with your thumb to release the module from the line card port. Before pulling out the SFP module, you must release the SFP module by pushing the sliding tab. If you pull the SFP module without releasing the tab, the SFP module will be damaged.
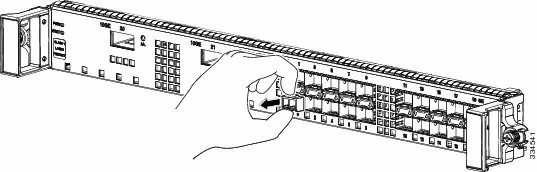
Figure 6: Removing a Slide Tap Latch SFP Module
- Put the SFP module on the antistatic mat, if you need to send it back to the manufacturer for repair or to other places, don't forget to put it in the anti-static bag.
- Like the SFP module, when the port on the switch is idle, it also needs to put specific cage covers in the SFP module cage to avoid dust.
Conclusion
The correct operation steps can not only protect the module from damage but also ensure the stable operation of the optical fiber link. If you encounter the types of modules not mentioned in the article and don't know how to operate, you can contact our customer service to help you via [email protected].
NOTE: Part of content reference from: https://www.cisco.com/c/en/us/td/docs/routers/asr1000/install/guide/linecard/asr1lc_hig/lc_asr1_chap4.html


share
